|
Step
1:
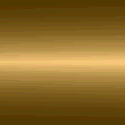
Create your golden gradient. Run
it from a gold-tone yellow to a very deep shade of the same hue. If your
program is capable, have it repeat vertically on a B - A - B basis (the dark
to light, back to the dark) and move on to Step 2.
Many simple paint programs permit gradients from only one hue to a second,
and this B - A - B repeat will need to be set up manually (Steps 1a &
1b). When you have your golden yellow to deep brown set, apply it to a window
about 300 x 300.
|
 Step 1a: Step 1a:
Copy the gradient you
just applied, then clear the window so it is blank. Paste the image from
Clipboard and resize it so that it only fills half the window from top to
bottom, with the lighter section towards the center. Copy this new size.
|
 Step
1b: Step
1b:
Paste again from Clipboard and flip
the image vertically. Position it into the window so that the lighter end
blends into the half that was added in Step 1a. Now save the image you just
created. Preferred formats are: BMP, PCX, PNG, TIF or TGA. Avoid a
reduced-palette (like GIF) or a compressed format (like JPG) because you'll
want to retain the gradient's integrity for repeated uses in the future.
|
Step
2:
Prepare your text. Give your text
a solid color that is unlike your background, shadow or any tone in the gradient.
(Try hot pink.) You may want to add a tight or drop shadow and it could be
done at this point.
|
Step
3:
Create a new window close to the
same size but slightly larger than your text. Don't make it too precise or
you won't leave yourself any room to work with, but don't make it overly-large,
either, or the gradient effect will not respond the same. Apply (or paste
a copy of) your golden gradient into this new window. (When pasting, you
will need to re-size it to fit the new window; don't paste only part of the
gradient, use the entire image.)
|
Step
4:
Set your background (transparent)
color to the color you gave the text in Step 2, then paste a copy of your
text over the gradient. Adjust its position to where the lights and darks
look the most pleasing for you and de-select. That's all there is to it!
|

Finished Golden following the technique
given here.
|

How would it look if it was aligned
for the lighter
gradient section to be higher on the lettering?
|

How would it look with some shaping
highlight added?
|

This image was created along a similar
route, but
Kai's Power Tools was used for the gradient
and Blade Pro supplied the beveled edge highlights.
As you can see, the result is very similar
to what we can make "by hand."
|

Say...what if we used one of those
really
fancy fonts like Champagne?
|

And gee...would Golden work with
dingbats, too?
|
Hey, what about _____ ??
[fill in the blank and have fun!]
|
|