|
|
| Step
1 |
Open a new image window in your paint program. Use a "small" but generous
size, such as 200 x 200.
|
| Step
2 |
Decide on a color scheme to work
with. For generally best results, use no more than 4-5 different colors.
(Of course, you might also have great results using 50 colors or more, depending
on what effect you're aiming for.)
|
| Step
3 |
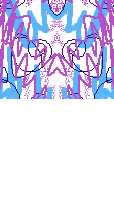
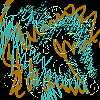
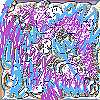
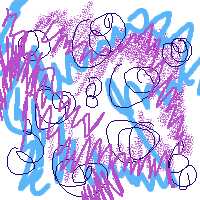 Scribble. Scribble.
This is the fun part, so go ahead and enjoy it! Use the pen tool at various
widths. Use the airbrush. Use chalk. Use crayon. Use a combination of several
brush tools together. Have fun, go wild! (You can add filters and textures
at this point, too!) Your finished scribbling might look something like this
one.
|
| Step
4 |
Save it?
Maybe it doesn't look like "great art" yet,but you might want to save your
scribble if it's a particularly intriguing one, because they can be used
and re-used over and over to create new and interesting designs, depending
on where and what size your step #5 selection is made. If you don't want
to save it, that's okay, too, since scribbles are fun to make and it's very
easy to make new ones.
|
| Step
5 |
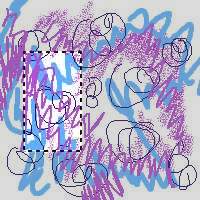 Now, to create
the Scrib tile! Select a portion of your scribble with your rectangular cutting
tool. It can be a large chunk or a small slivver, horizontal or vertical
or square. When you're new at this, I suggest using a good chunk, not too
small, because it'll be easier for you to move it around. I chose a portion
just left of the center of my scribble. Now, to create
the Scrib tile! Select a portion of your scribble with your rectangular cutting
tool. It can be a large chunk or a small slivver, horizontal or vertical
or square. When you're new at this, I suggest using a good chunk, not too
small, because it'll be easier for you to move it around. I chose a portion
just left of the center of my scribble.
|
| Step
6 |
Copy your selection and paste it into a new window. Assuming this new window
is the same size as your selection, resize it now to 200% (twice as large
in both directions). Now clear it to make it blank.
|
| Step
7 |
 Paste in your Step
5 selection that should still be on Clipboard in its original size. Position
it into the top left corner of the window. Paste in your Step
5 selection that should still be on Clipboard in its original size. Position
it into the top left corner of the window.
|
| Step
8 |
 Mirror the window (which
turns it horizontally, putting the left side in reverse to the right). Paste
the selection again to the upper left corner. Mirror the window (which
turns it horizontally, putting the left side in reverse to the right). Paste
the selection again to the upper left corner.
|
| Step
9 |
 Flip the window (which
turns it vertically, putting the top in reverse to the bottom). Paste the
selection for the third time to the upper left corner. Flip the window (which
turns it vertically, putting the top in reverse to the bottom). Paste the
selection for the third time to the upper left corner.
|
| Step
10 |
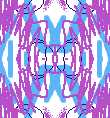
 Mirror the
window once more (turn it horizontally, putting the left side to the right).
Paste the selection for the last time to the upper left corner. Mirror the
window once more (turn it horizontally, putting the left side to the right).
Paste the selection for the last time to the upper left corner.
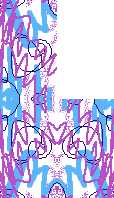
Now you have created a totally original, seamless tile from a simple scribble!
I call this making a Scrib! Save it! Play with it!
|
How your Scrib turns
out depends on the scribble you start with and the all-important step #5
-- where and what size your selection is made. Having finished your first
Scrib, you might want to go back to step #5 and try a different selection.
Make a Scrib of that and see how different it looks from your first -- even
though both come from the same scribble!
|
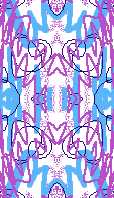
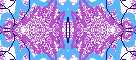
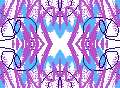
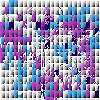
Here are some additional
Scribs I made starting from the same sample scribble above, but using different
selection areas. Compare these to the finished Scrib in step #10, and you'll
get an idea of just how versatile one simple scribble can be.
|
What
if...?
 What if the scribbling had been done in other colors? What if the scribbling had been done in other colors?
 What
if a special effects filter had been applied prior to step #5? What
if a special effects filter had been applied prior to step #5?
 What if a fun plug-in like Blade Pro had been used on top of
the scribble just for fun? What if a fun plug-in like Blade Pro had been used on top of
the scribble just for fun?
 What if the scribbling had been done using a font? What if the scribbling had been done using a font?
|
|
|
What if you have
even more ideas that could be tried out? The possibilities of the Scribs
that can emerge is incredible and limited only by your imagination!
|
|
|
Go
For It!
What can you do with a Scrib now that you have one? Darn near anything! It
is completely seamless tiling, so you can use it immediately for desktop
wallpaper or a web page background (see
a sample). You can made additional designs from it, by applying filters
or adding more scribbling (for best results, particularly with methods like
embossing, use these filters prior to step #5). Scribs make excellent border
art (see a sample), and they
also make "instant" framework for special messages
(sample here).
Can you think of other uses for them? Once you've started, you'll probably
find the list of possibilities is virtually endless.
|
|
|
Best of all, your
Scrib design is completely your own! Whatever you want to do with it, you
never need to worry about getting permissions or violating someone else's
copyright. Your original work is protected by your copyright, so you
can use it in any way you choose!
|
|
|