| 1 - Open a New file in Vue d'Esprit
and select any atmosphere.
2 - Move to Layer 2. Right-click
on the Terrain icon. Uncheck the fractal options if necessary. You can set
the size for 256x256 here, or use the increase size option on the next
screen.
3 - Upon reaching the terrain screen,
you should have a blank area to start with, set to a size of 256x256 (or
larger, if you like).
4 - Set the Raise tool to a smallish
diameter, a size that will be easy for you to work with (which will depend
on your particular project).
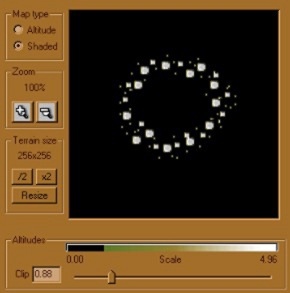
5 - Draw several dots in a circular
pattern (or in a line for icicles). Add some smaller dots, also following
the circular design.
6 - When you're satisfied with the
drawing, use Diffuse once or twice, then raise the Clip level to remove all
unused portions of the terrain square. You'll have an item that looks something
like this:

7 - Return to the main Vue screen,
and rotate the terrain 270 degrees on the X direction. This should place
the "circle of dots" perpendicular to the horizon and facing your
camera.
8 - Now stretch the terrain object
vertically to make it as tall as you want your waterfall to be. Apply a water
texture to it. You may want to modify the water texture to be extra bumpy.
The more it catches the light, the more it will appear like falling water.
9 - Create a Sphere primitive and place it at the base of your waterfall,
where it meets your river or lake. Apply a Halo material to this Sphere and
increase the Ambient setting as needed for your scene. This becomes the spray
at the base of the waterfall.
10 - Create additional terrains to form your landscape, and enjoy your
results!

Select the image to view
it in a larger size (77 kb).
|

